- Preface
- Markup Languages - A Definition and Some History
- Beginning HTML
- HTML Lists
- HTML Tables
- HTML - Color, Fonts and Special Characters
- HTML Links
- HTML Images
- HTML Frames
- Cascading Style Sheets
- MicroSoft PhotoDraw
- JavaScript
- HTML Forms and Form Handling
- VBScript
- MicroSoft FrontPage
- Active Server Pages
- Java Applets
- XML Meaning and More
- Macromedia Flash 5.0
- References
Macromedia Flash
Flash is an application that facilitates adding multimedia effects to webpages.Because Flash was designed specifically for the web, the file sizes created by Flash are relatively small.That allows web designers to add animations and interactions to webpages in the same number of bytes as a good photograph. Flash is primarily used for its entertainment value. If used inappropriately, it can turn off, rather than engage your audience. Flash is therefore not appropriate for all web sites. Flash is most often used to create animations or movies . However Flash can also be used for rollover effects like those that can be accomplished using JavaScript. (See Section 12).Flash is based upon vector graphics rather than raster graphics. GIF and JPG files are based on raster graphics. In raster graphic files, each pixel is defined with a color intensity. If you zoom in on a raster graphic, each pixel can be enlarged to the point that it looks like squares. Curved lines will eventually look jagged. In vector graphics files, geometric equations are used to define an image. As you zoom in on a vector graphic, the outlines will continue to be smooth. Raster graphics are better for photographs. Vector graphics are great for images that consist of lines and shapes. Flash can also incorporate raster images.
Using Flash 5.0
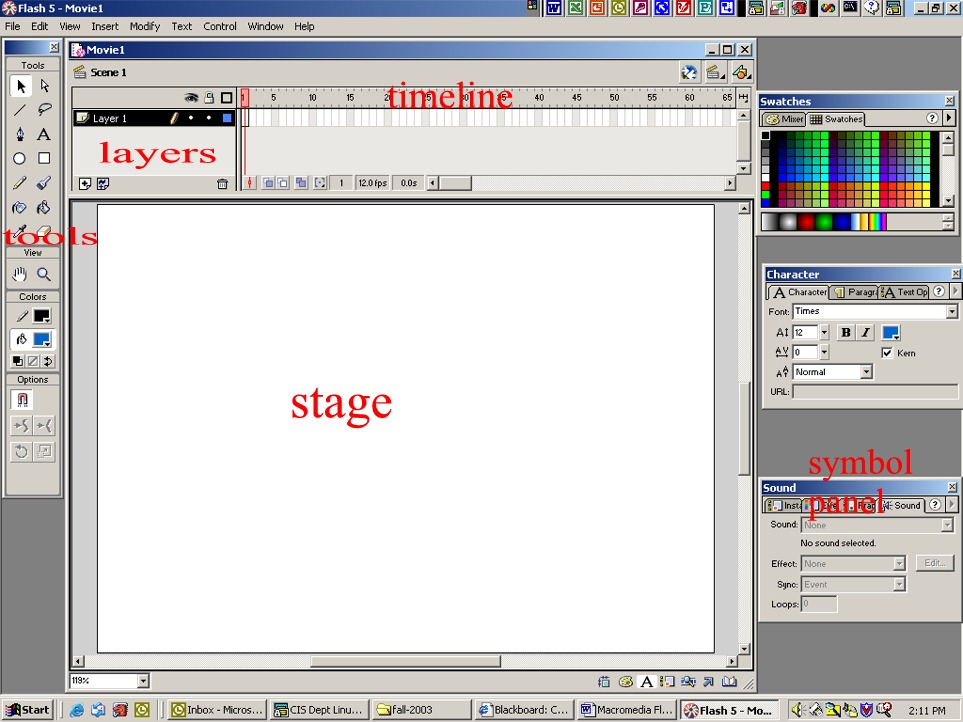
There are a number of different concepts that you must be familiar with in order to use Flash. The first is the stage.The stage is where the Flash movie will be put together. The stage displays what will be seen in your movie.The third important concept in Flash is that of layers. Layers are used to separate graphics, animation, sound and actions on the stage. For example, a “movie” might have a stationary backdrop image in one layer, and another layer which contains a picture of a car moving across that image. Each layer has its own timeline.
There are a number of panels which provide different tools associated with the different objects in Flash. These panels can be opened using the Windows menu.
When you start Flash, you will see the following screen.
Drawing in Flash
The drawing facilities in Flash are good, but not as
sophisticated as those provided in MS PhotoDraw or Adobe PhotoShop.
To create your own drawing in Flash, select the Pencil, Brush or Pen
tool. Every shape that you draw in
Flash has a stroke and a fill. The
stroke is the line defining the object and the fill is the solid color inside of
a shape. For the stroke, you also
have the options of “smooth”, “straighten” or ink for each outline you
draw. Choosing “smooth”
will keep the lines you draw curved.
“Straighten” will help you to draw straight-line geometric shapes.
Choosing “ink” doesn’t modify your drawn lines much at all.
After drawing a shape, you can make different color choices for the
“stroke”, the outline of the shape and the “fill” color for the shape.
The fill for a shape can be solid or gradient. However, you should be aware that gradient fills will slow
down animations. After completing a
drawing, use the arrow or the lasso tool to select the drawing and then convert
it to a symbol by choosing Insert/Create New Symbol .
A dialog box will appear. Choose
Graphic for the symbol type, and type in a unique name for the symbol.Importing Images into Flash
If you choose to draw shapes in another graphics program,
they can be imported into Flash as long as they have been saved in one of the
standard graphics formats such as GIF, JPG or PNG.To import an image file, go to the File menu and
select Import. Select
the file or files that you want to import.
They will be placed in the movie Library.
To access the Library, hit CTRL+L.
Each image should be converted to a symbol. To convert an image to a
symbol, select the image from the Library Panel list.
A copy of the image will appear in the preview pane of the Library Panel.
Drag the copy from the Library panel to the stage.
Make sure that the image is selected and then convert it to a symbol by
choosing Insert/Create New Symbol .
A dialog box will appear. Choose
Graphic for the symbol type, and type in a unique name for the symbol.Symbols
Creating symbols helps control the size of the Flash movie
file. When you create a symbol, all
of the information for that image is saved only once.
Then, when we want to use the image, we just create an
instance of the symbol on the stage. Repeated
instances of the same symbol use less space than multiple copies of the same
image.Creating an Animation Using a Drawing
Start Flash. You should see the timeline at the top of the screen and the "stage" – a large white square
that takes up most of the window. If you have not already drawn or imported your
images and converted them to symbols as described above, you should do so now. Make
sure that the first frame (#1) is selected in the timeline. To place a symbol on the stage,
just select it in the symbol library list and then drag the it or the preview image
to the stage. To change the size of the image, to rotate it, or transform it in other ways, make sure that the symbol is selected on the stage, and then go the Modify menu and select Transform and select the operation you wish to perform. To re-position the symbol, just click on it and drag it to the position on the screen that you like.
If this image is to be your background image, you want it to appear in every frame of the "movie". So, in the timeline for this layer, click in a frame a good bit further down the time line, like 65. Choose Keyframe from the Insert menu. When you do, all of the frames in between the first frame and the one selected further down should turn gray, indicating that this image will be on the stage from the beginning to the end of your movie.
If this image is the one that is going to be moving on the stage, in the timeline for this layer, click in a frame a little bit further down the time line, like 15. Choose Keyframe from the Insert menu. When you do, all of the frames in between the first frame and the one selected further down should turn gray. On the stage, position the image at a new position by dragging it. Scale or rotate the image as desired using the Transform command on the Modify menu. Now, go back to the timeline for this layer, and right-click anywhere in between the two keyframes. Select Motion Tween. Flash will produce the intermediate frame sequences to make the image look as if it gradually moved from the position in keyframe #1 to keyframe #15. This is similar to the process that cartoon animators used to go through. A master animator would draw the major frames of a scene, and the lower-level animators would be responsible for drawing the intermediate frames which provide the motion from one keyframe to the next. The frames will be displayed in the movie at the default rate of 12 frames per second. To see the motion, click in the first keyframe and hit the Enter key on the
keyboard.
Repeat the process above if you want that symbol to move again.
To add a new symbol, add a new layer. The new layer will have its own timeline. Click on a frame in which you want the new symbol to appear, and drag the symbol from the library to the position on the stage where it should appear. Then repeat the steps above to
animate the new symbol.
Creating a Series of Photos
Background color can be changed in the Movie Properties dialog box which can be obtained by right-clicking on the stage or selecting Movie from the Modify menu.
If you have not already drawn or imported your images and converted them to symbols as described above, you should do so now. Make sure that the first frame (#1) is selected in the timeline. To place a symbol on the stage, just select it in the symbol library list and
then drag the it or the preview image to the stage.
To change the size of the image, to rotate it, or transform it in other ways, make sure that the symbol is selected on the stage, and then go the Modify menu and select Transform and select the operation you wish to perform. To re-position the symbol, just click on it and drag it to the position on the screen that you like. In the timeline for this layer, click in a frame a little bit further down the time line, like 15 or 20. The higher the number of the later frame, the longer the image will remain on screen during the movie.
Choose Keyframe from the Insert menu. When you do, all of the frames in between the first frame and the one selected further down
should turn gray. In symbol panel (lower right of screen) select the Effects tab. Choose Alpha from the pull-down menu. A box will
appear next to the pull-down menu that has "100%" in it. Either type in 0, or click on the arrow next to the percent and slide the slider control to zero. The image will disappear.
Now, go back to the timeline for this layer, and right-click anywhere in between the two keyframes. Select Motion Tween. Flash will gradually fade out the picture from keyframe #1 to keyframe #15.
The frames will be displayed in the movie at the default rate of 12 frames per second. To see the motion, click in the first keyframe and hit the Enter key on the keyboard.
To add a new symbol, add a new layer. The new layer will have its own timeline. Click on a frame in which you want the new symbol to appear, and drag the symbol from the library to the position on the stage where it should appear. Then repeat the steps above to
gradually fade out the new symbol.
If you want a picture to fade in, set the Alpha value for the first frame in which you want to have the picture begin fading in to zero, or a very low Alpha value, insert a keyframe farther down the timeline for the layer, and set the later image's Alpha value to 100%.
By combining both procedures above, you can have an image fade-in and then fade-out.
Stopping the Movie from Repeating
Double click on the keyframe in which you want to stop the movie. The Actions panel will appear. Click on the plus sign button and then choose Stop from the Basic Actions list.Adding a Button to Stop the Movie
Add a button by ‘inserting’ a new symbol into your library list.- I drew a circle shape
- I added a ‘grey/white gradient’
- I added text to it with the text tool – make sure that the color of the text is one that will show up on the button
- In the down frame, I changed the button to have a solid color, instead of the gradient.
- In the hit frame, I changed the button to have a solid color, instead of the gradient.
Add a new layer and then place the button on the stage.
Make sure that the button is highlighted, and select Window/Actions. The Actions pane will appear.
From the Basic Actions, doubleclick on Stop. The following code should appear in the edit window
on (release) {
    stop ();
}
Close the Actions pane and test the movie.
Publishing Your Flash Movie
There are a number of ways that you can test and then optimize Flash movies, but they will not be covered here.To "publish" your Flash movies, save your movie as an SWF file (ShockWave Flash) file and then embed the movie in an HTML file.
To publish your movie, go to the File menu and select Publish. A dialog window will appear. Click on the Flash tab. There are a number of things you can modify on this window, but in most cases, the default settings will do. You may want to save it as a Flash 5 version in order to be compatible with older Flash plug-ins. Click on the Publish button to save your movie as .swf file.
Embed Your Flash Movie in an HTML Page
To embed your movie in an HTML page, add an embed tag similar to the following:<embed src="yourmovie.swf" width="550" height="400" >
</embed>
where "yourmovie.swf" is the file name of your published Flash movie.
NOTE: You must use the Flash file with the .swf extension, not the version with the .fla extension.
Since all Flash content requires the same plug-in to play, you shouldn't have to test this HTML tag with various browsers as you should do with almost all other HTML tags. That is, unless you have used ActionScript intensively. In that case, you should test with
various versions of the plug-in software.